EdAlive Central (Schools) - SSO - Azure App Setup Process
Azure App Setup Process in Summary
- Add a New Non-gallery Enterprise Application
-
Configure the Single sign-on SAML settings as:
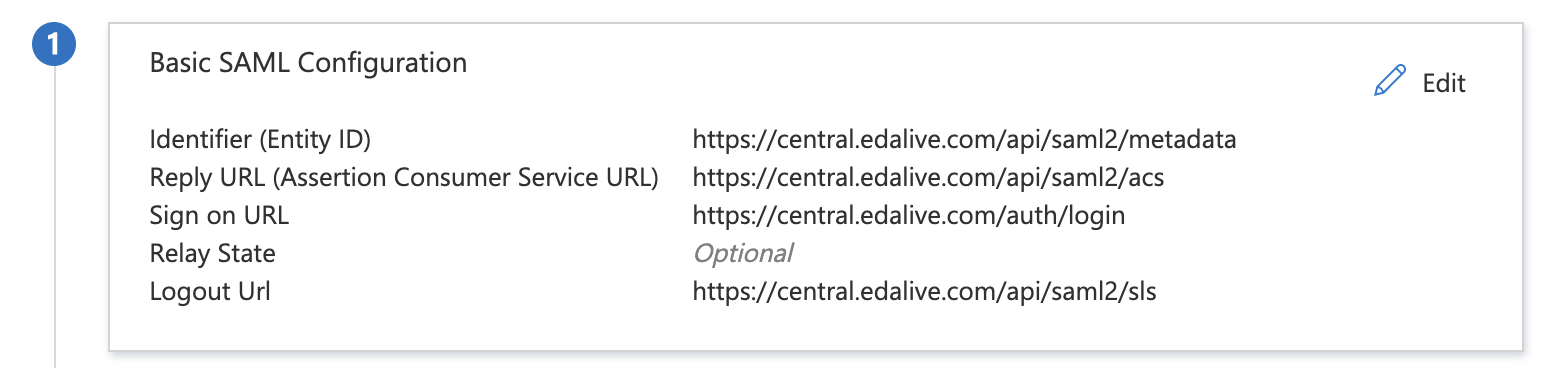
- Basic SAML Configuration
- Identifier (Entity ID)
->
https://central.edalive.com/api/saml2/metadata
- Reply URL (Assertion Consumer Service URL)
->
https://central.edalive.com/api/saml2/acs
- Sign on URL
->
https://central.edalive.com/auth/login
- Relay State
->
Optional
- Logout Url
->
https://central.edalive.com/api/saml2/sls
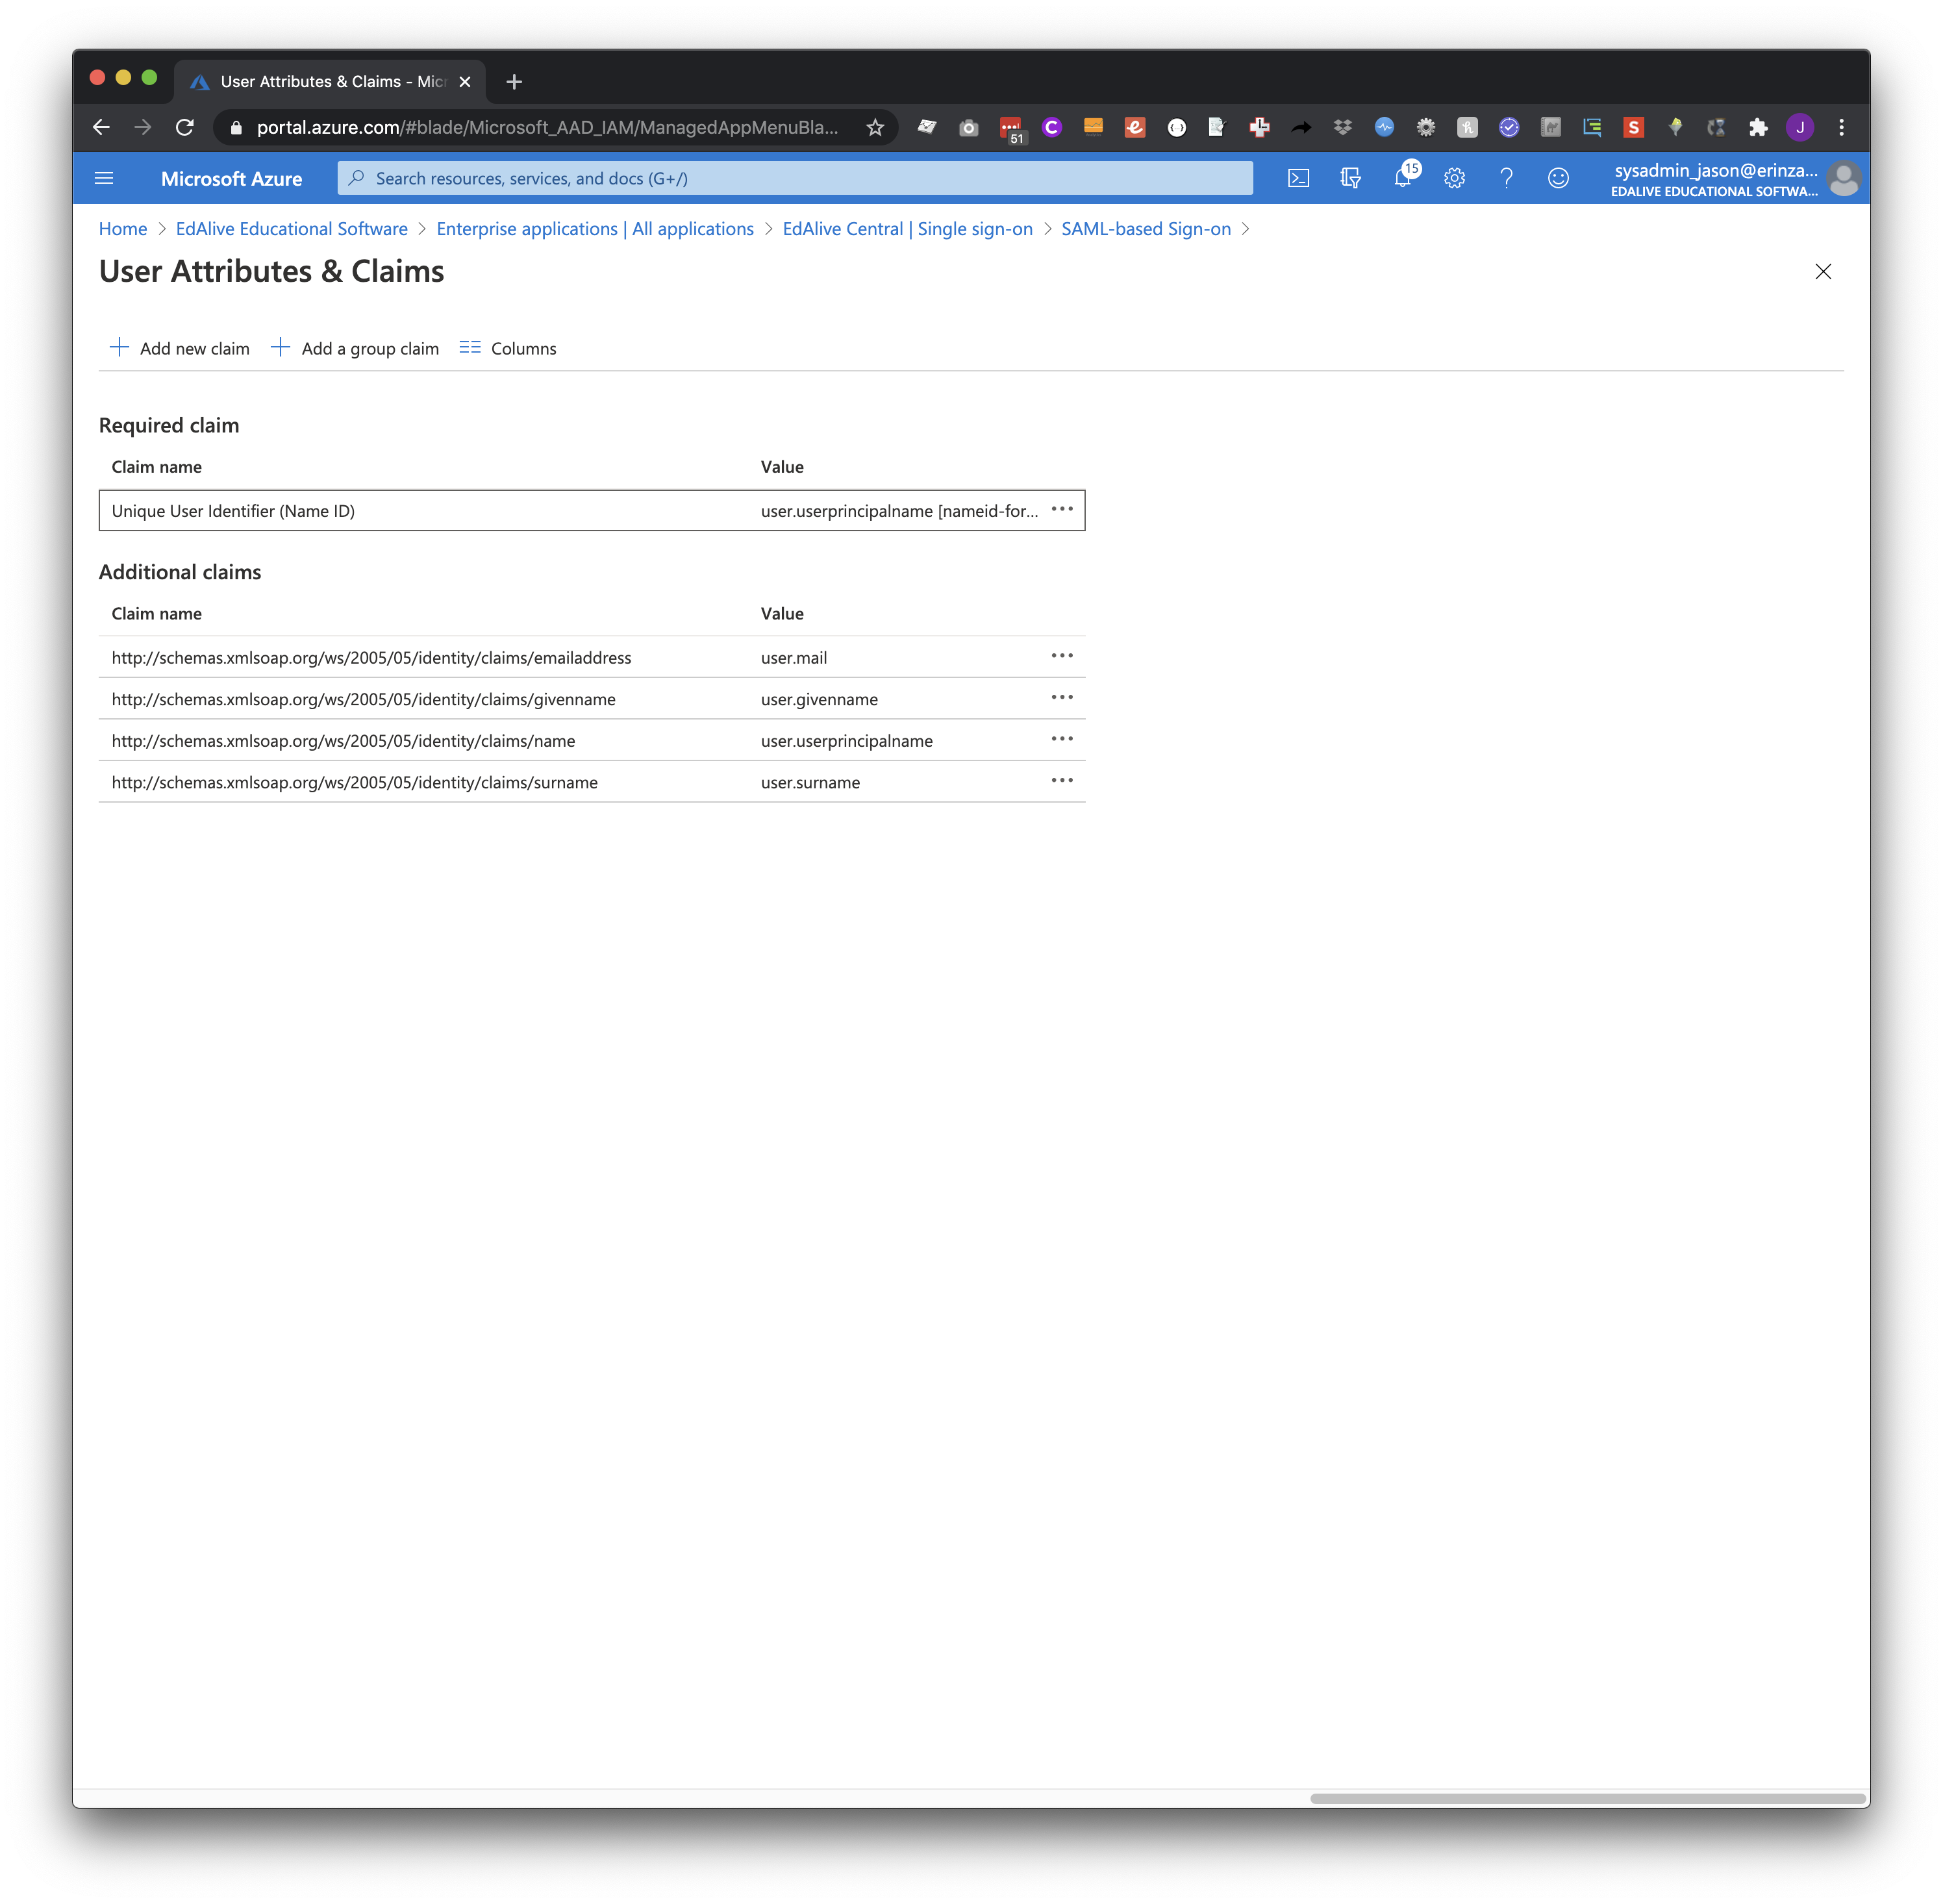
- User Attributes & Claims
- givenname -> user.givenname
- surname -> user.surname
- emailaddress -> user.mail
- name -> user.userprincipalname
- Unique User Identifier (Name ID)
- ⚠️ Edit the claim, set the identifier format to Persistent.
- Source attribute -> user.objectid (recommended) or user.userprincipalname
- Add a group claim
- All groups
- Group ID
- Assign Users and Groups access to the EdAlive Central Azure application
- Use this link ->
Click Here to use the Azure SSO Setup Template Email
to send us:
- The App Federation Metadata URL:
- The teacher group Object Id(s):
- The student group Object Id(s):
- Each School/campus name and group Object Id (when one Azure account hosts multiple schools/campuses):
- Domain name portion of email addresses
- Teachers:
- Students (if different to teachers):
- Sample Student Username:
- Sample Student Password:
- Wait for confirmation from us to confirm setup has been completed on our end.
- Test the SAML logins.
Azure App Setup Process in Detail
All of the steps are performed in Microsoft Azure. To begin, log into your administrator account.
Add the EdAlive Central Application
In the Azure Portal, on the left of the screen, click “Enterprise Applications”.
You will see the following page:
You will see the following page:
Name the new application “EdAlive Central” and then click “Add” on the bottom of the page.
You will see the following page:
Next, click the ‘Single sign-on” button on the centre-left of the screen.
You will then see these four options:
Click the “SAML” option.
You will see the following page:
Setup SAML
- Identifier (Entity ID) ->
https://central.edalive.com/api/saml2/metadata
- Reply URL (Assertion Consumer Service URL) ->
https://central.edalive.com/api/saml2/acs
- Sign on URL ->
https://central.edalive.com/auth/login
- Logout Url ->
https://central.edalive.com/api/saml2/sls
Configure User Attributes
Configure SAML Name ID
You will see the following page:
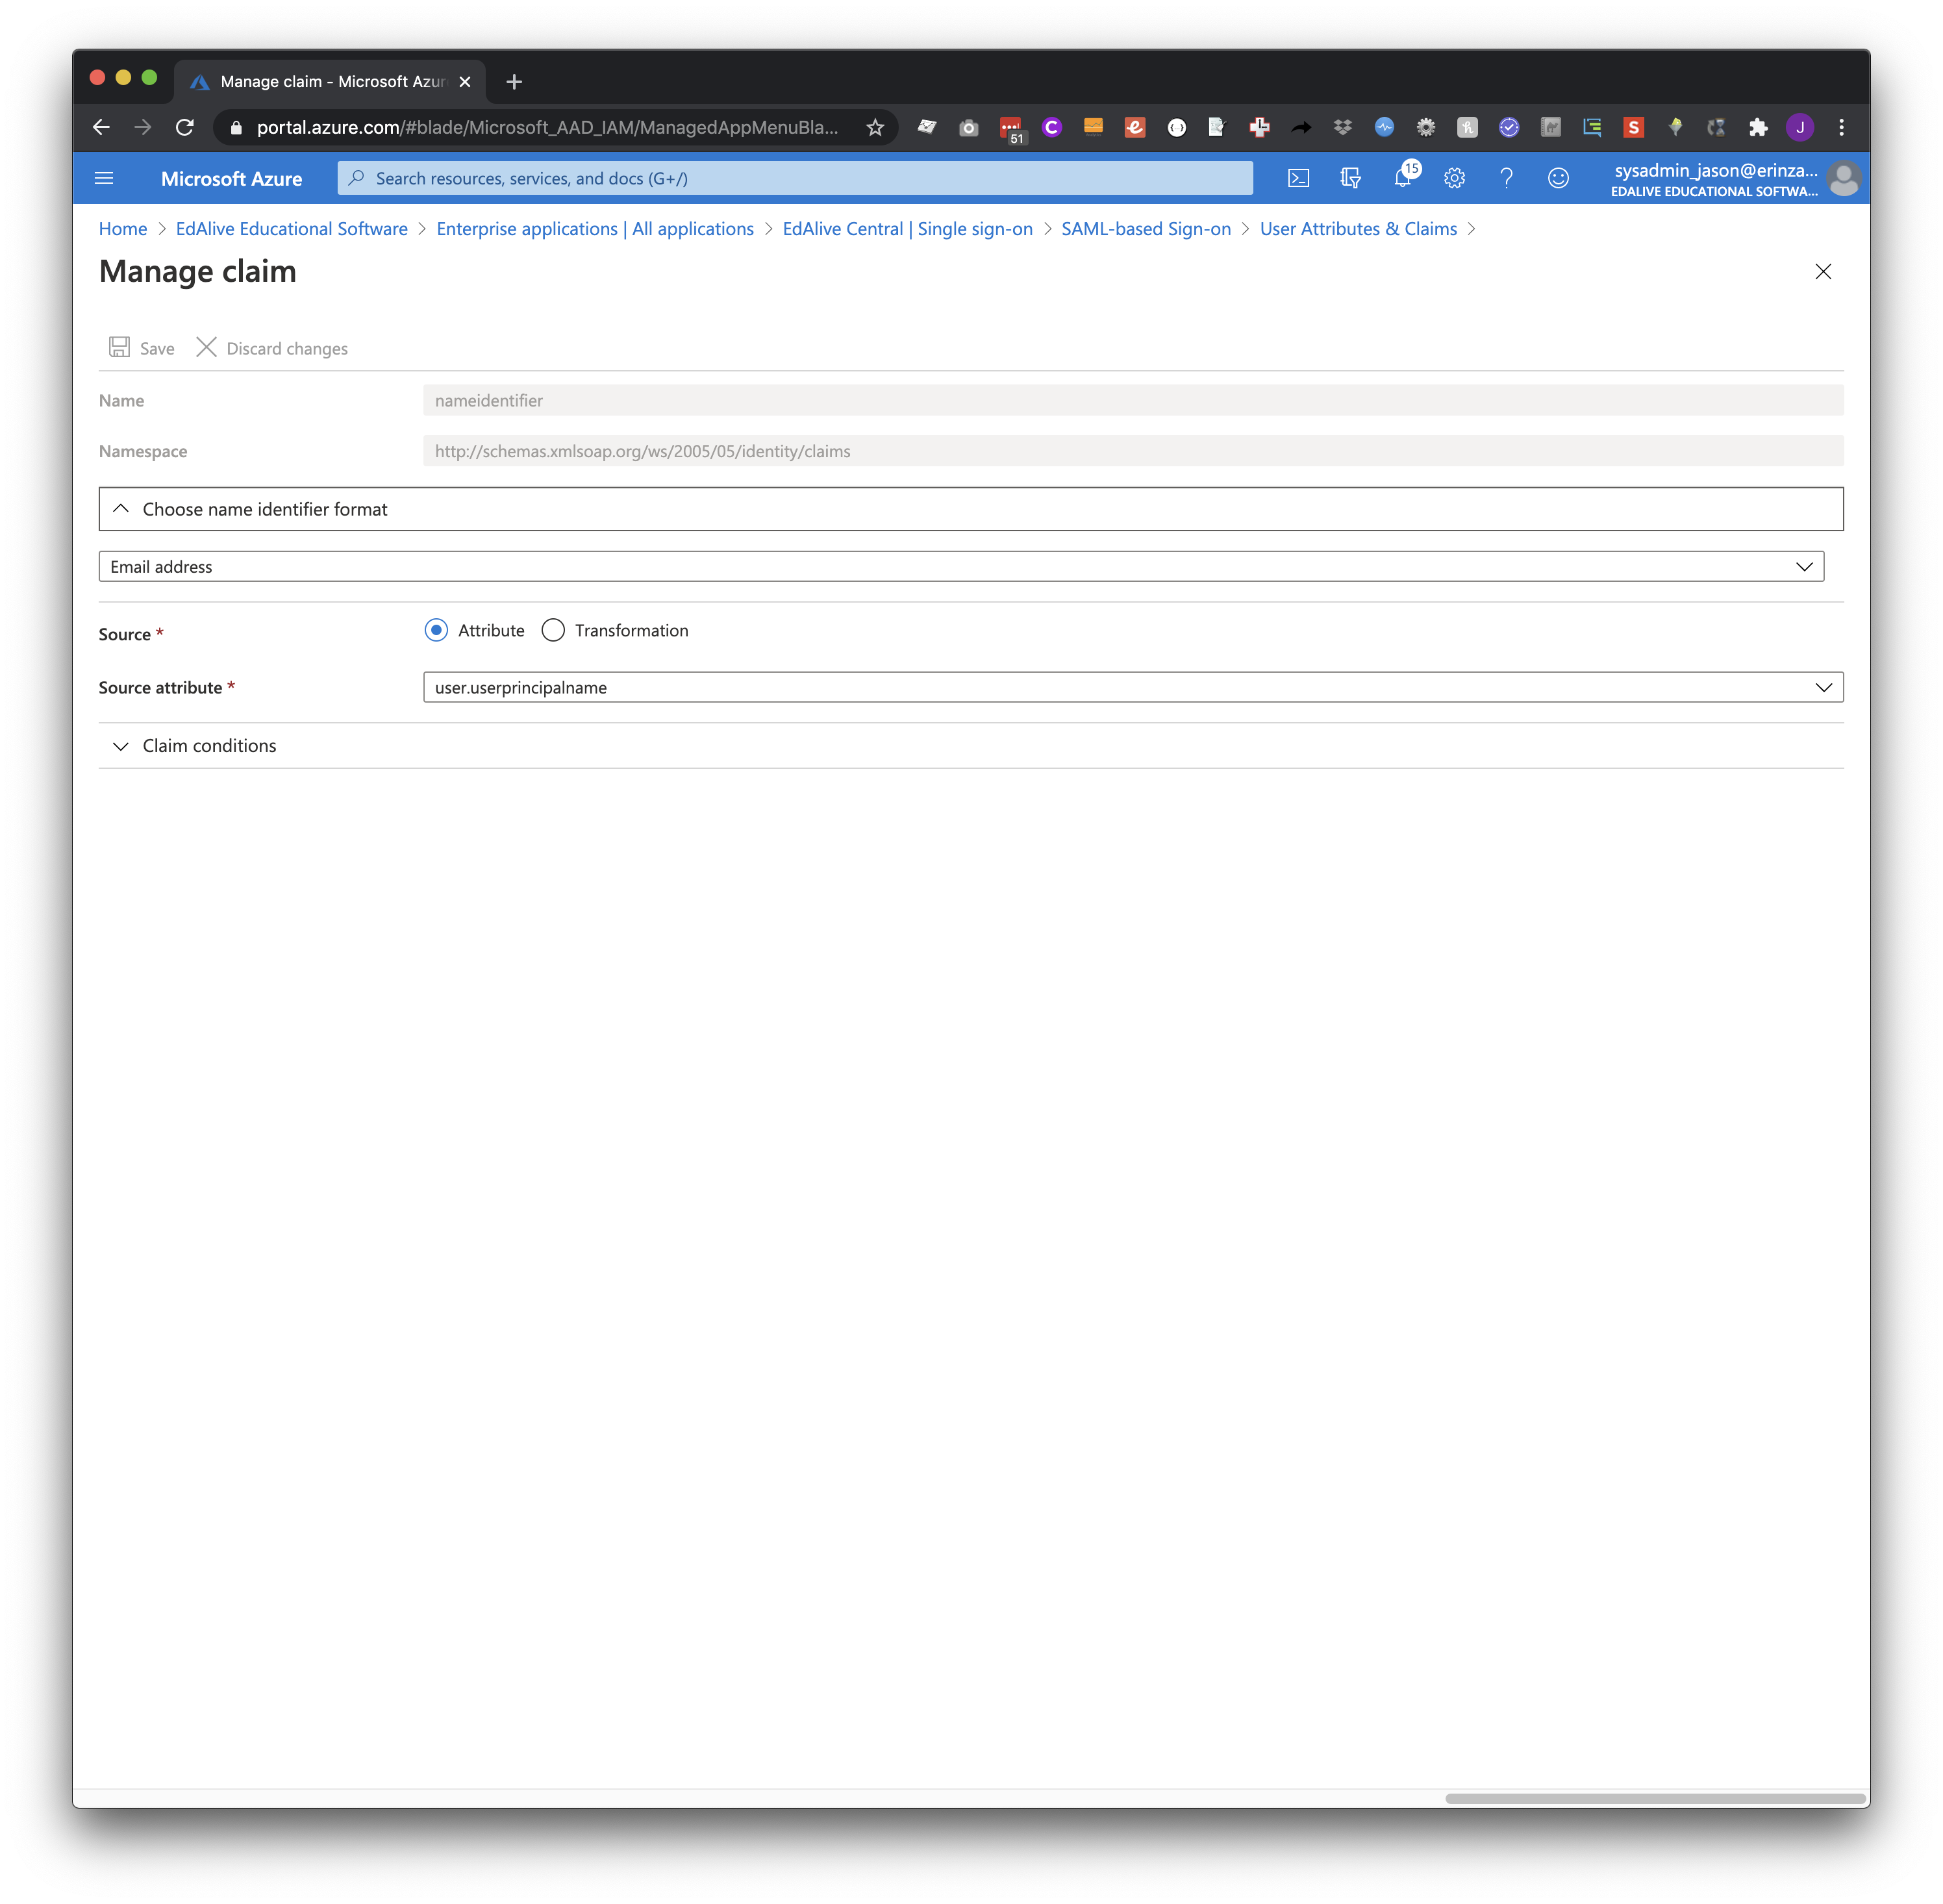
We recommend "user.objectid".
The Name ID value is store on EdAlive Central user accounts, and is used to identify and match existing EdAlive Central user accounts both during SAML logins and when a school admin account is performing a student SAML import. A student SAML import can be performed for the purposes of provisioning student accounts before their first SAML login, and for organising existing student accounts into their class groups in EdAlive Central.The disadvantage of using the UPN source attribute is that, being an email address, the UPN could potentially change, such as when a student adopts a new surname. If the Name ID attribute changes, then the link to that user's EdAlive Central user account would be broken. On the other hand, "user.objectid" is persistent for as long as that user account exists in Azure, regardless of changes to other Azure user attributes.The disadvantage of using the "user.objectid" source attribute is that classroom teachers and non-IT school administrators may not have access to the Azure object IDs of their students, making it more difficult to manage spreadsheets of their students for the purpose of student SAML imports. On the other hand, it may be easier for teachers to manage spreadsheets containing student emails.
Configure a Group Claim
For Azure SAML setups that serve multiple schools, such as a network of private schools, a group claim will also identify which EdAlive Central school account a user should be a member of.
You will see the following panel on the right-hand side of the page:
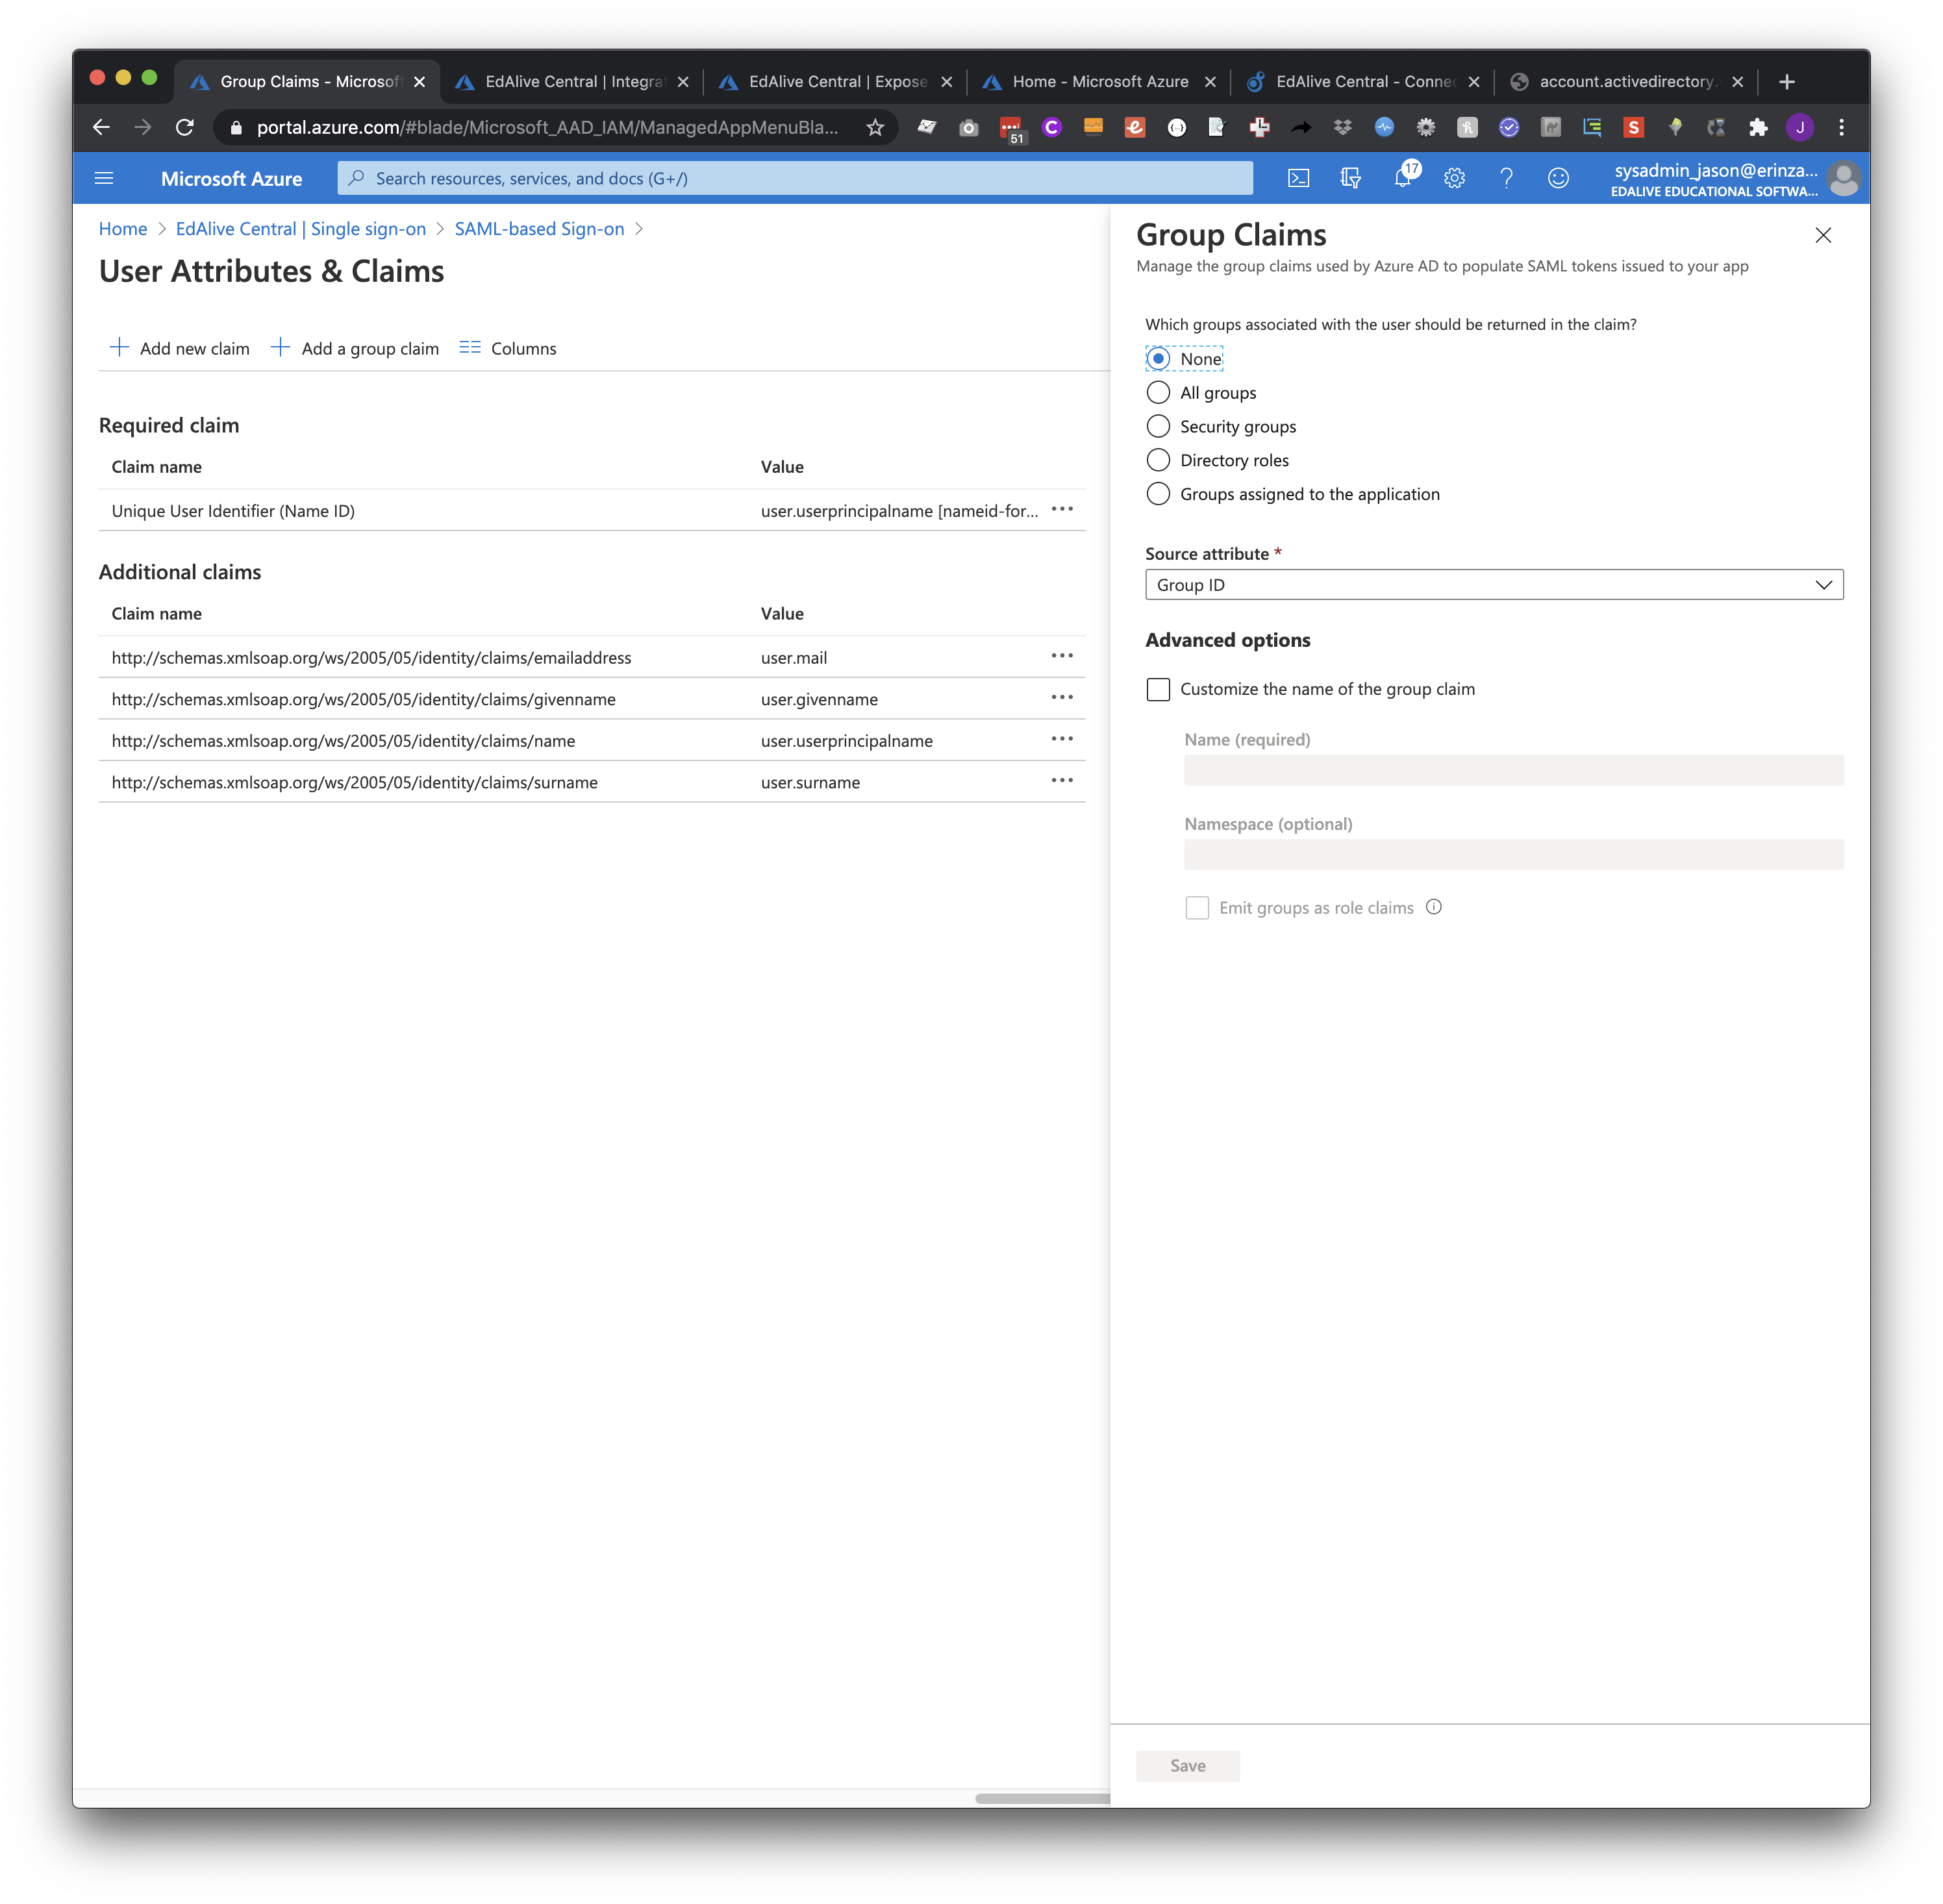
However, depending on the types of groups used in Azure by individual schools or multi-school networks, it might be sufficient for the purposes outlined above to select a different option which only includes those types of group in the user claims.
Click "Save".
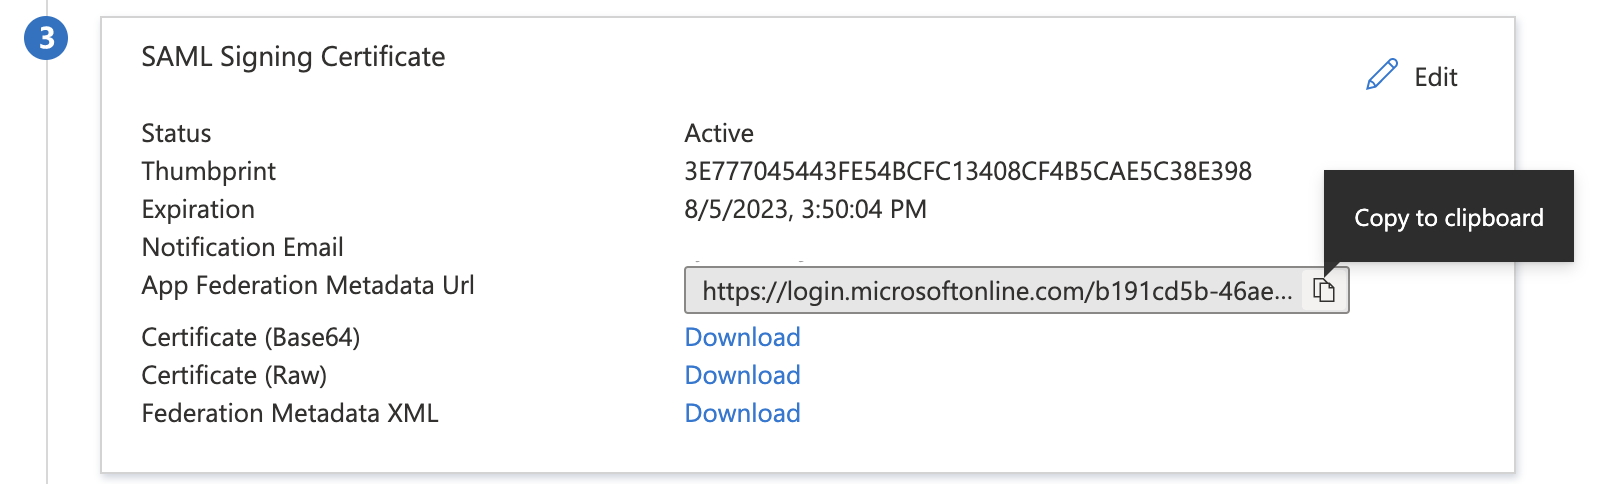
Federation Metadata URL
Assign Users and Groups to the EdAlive Central application
Assign the users and groups.
Send EdAlive the Azure SSO Setup Information
Use this link ->
Click Here to use the Azure SSO Setup Template Email
to send us:
The App Federation Metadata URL:
The teacher group Object Id(s):
Each School/campus name and group Object Id (when one Azure account hosts multiple schools/campuses):
Domain name portion of email addresses
Teachers:
Students (if different to teachers):
Sample Student Username:
Sample Student Password:
Test the SAML Logins
In section "5 - Test single sign-on with EdAlive Central", click the "Test" button, and follow the prompts to test the SAML login process.
Related Articles
EdAlive Central (Schools) - (Video) Setting up Single Sign On (SSO) - Azure
Microsoft Azure Single Sign On instructions link: https://central.edalive.com/sso-help-azureEdAlive Central (Schools) - The EdAlive Central Suite of Web Apps
EdAlive Central - One app to unite them all EdAlive Central (central.edalive.com) is the ground-breaking system that unites all the EdAlive Web Apps into one seamless whole. It manages all functions relating to Schools including: Students and their ...EdAlive Central (Schools) - Single Sign-On (SSO)
EdAlive Central provides easy access using a range of Single Sign On (SSO) systems including Google, Facebook, Office 365, Microsoft Azure and SAML enabled ADFS services. EdAlive Central Single Sign On The EdAlive Central system is in itself a Single ...EdAlive Central (Schools) - SSO - Active Directory Federation Services (ADFS) Setup
To make it a as quick and simple as possible for students to sign in to EdAlive Central, we now support Single Sign On with SAML 2.0 enabled Active Directory Federation Services (ADFS). Using Single Sign On, students can login using their existing ...EdAlive Central (Schools) - System Requirements
Any device, anywhere, anytime All EdAlive Central Web Apps work on any device including Windows PCs, Apple Macs, Surface Tablets, iPads, Chromebooks and other Android tablets. Unlimited Access 24/7 wherever there is an Internet connection. No need ...
Download the PDF Guide

Download the PDF Guide
Download the PDF Guide

Download the PDF Guide
Download the PDF Guide

Download the PDF Guide

Download the PDF Guide

Download the PDF Guide