EdAlive Central (Schools) - SSO - Active Directory Federation Services (ADFS) Setup
To make it a as quick and simple as possible for students to sign in to EdAlive Central, we now support Single Sign On with SAML 2.0 enabled Active Directory Federation Services (ADFS).
Using Single Sign On, students can login using their existing school username and password without needing to remember whole new set of credentials just for EdAlive Central!
System Requirements for ADFS Single Sign On
- Active Directory Federation Services (ADFS) setup and configured with SAML 2.0 protocol support
Configure EdAlive Central in Active Domain Federation Services (ADFS)
Configure ADFS Relying Party Trust
EdAlive Central will need to be configured as a trusted relying party.
Start the "Add Relying Party Trust..." wizard from the ADFS Management screen.
Enter the URL "https://central.edalive.com/api/saml2/metadata" in to the Federation metadata address URL field.
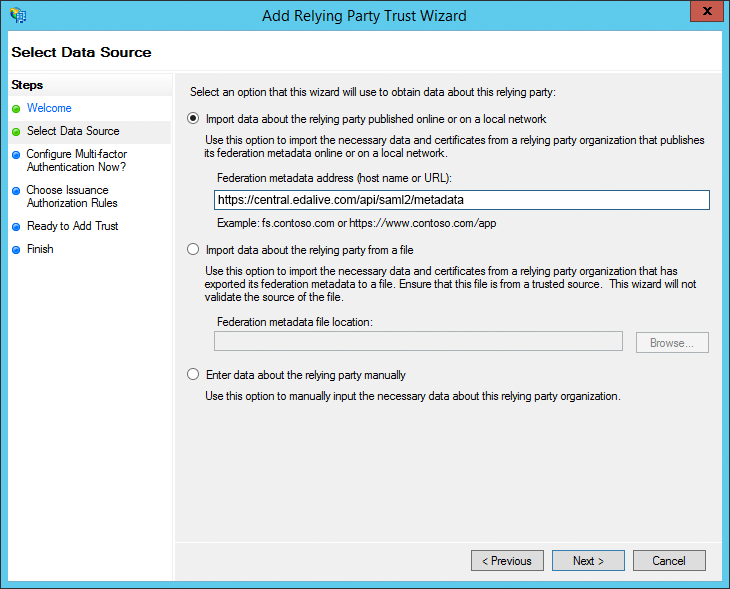
Continue to the end of the wizard using the default options.
Configure SAML Subject with Persistent NameID
The persistent NameID is provided by default with most SAML identity providers, however ADFS may need an additional claim rule for it to be included.
Add a claim rule based on the "Transform an Incoming Claim" rule template with the following settings:
NOTE: The incoming claim type could be set to something other than the UPN (usually the user's username). It needs to be an attribute that is unique and unchanging for each user.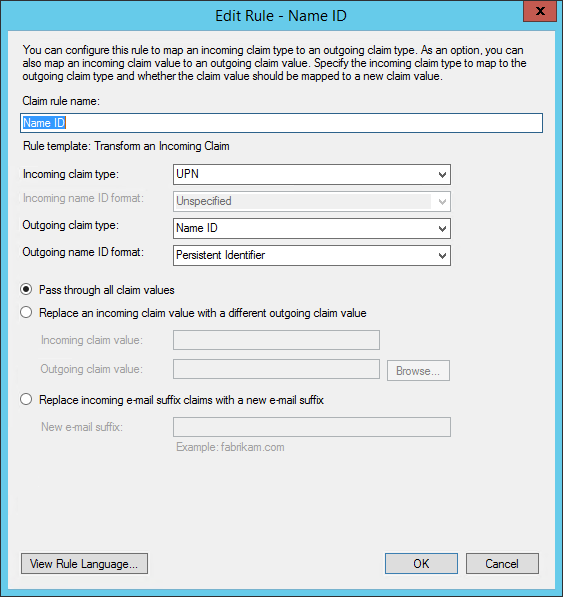
If you are using ADFS v2 you may also need to create an additional LDAP claim for the NameId. (NOTE: This is not required in ADFS v3 and above.) Create a new claim rule based on the "Send LDAP Attributes as Claims" rule template with the following settings:
LDAP Attribute "User-Principal-Name" map to "UPN" outgoing claim type.
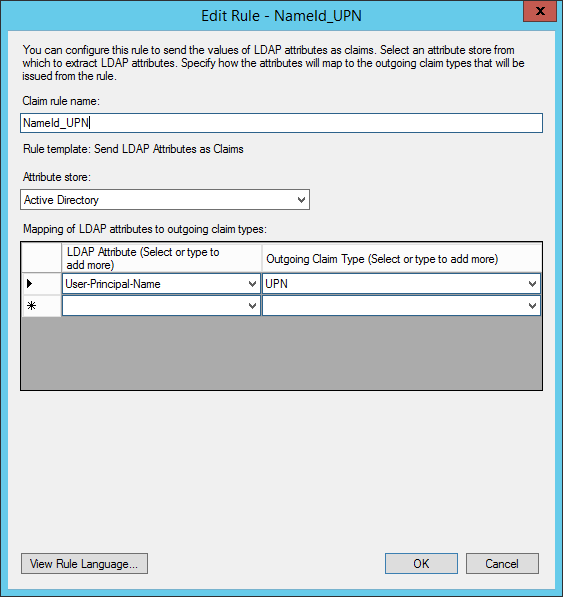
If you are using ADFS 2, you should have "User-Principal-Name" LDAP attribute mapped twice, once in the ADFS v2-unique "NameId_UPN" rule to "UPN", and once in the "Attributes" rule (for all versions of ADFS) to "E-Mail Address" (see below).
Configure ADFS to Provide User Attributes
Configure ADFS to provide the user's first name, last name and email attributes by creating a claim rule based on the "Send LDAP Attributes as Claims" rule template with the following settings:
NOTE: The attribute table drop down buttons sometimes take a few clicks to activate.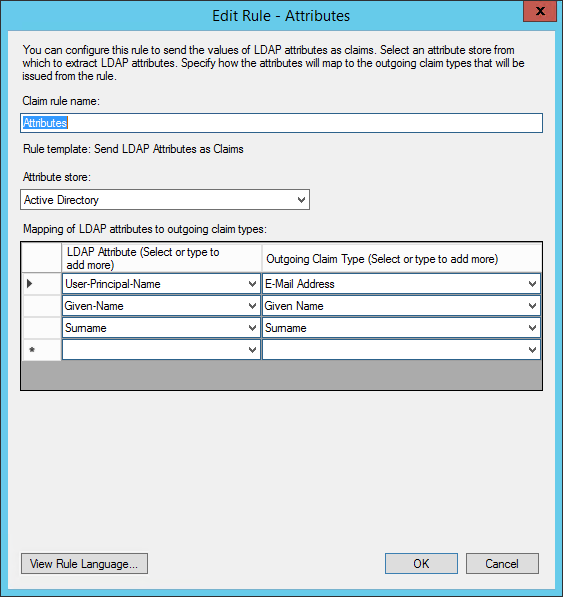
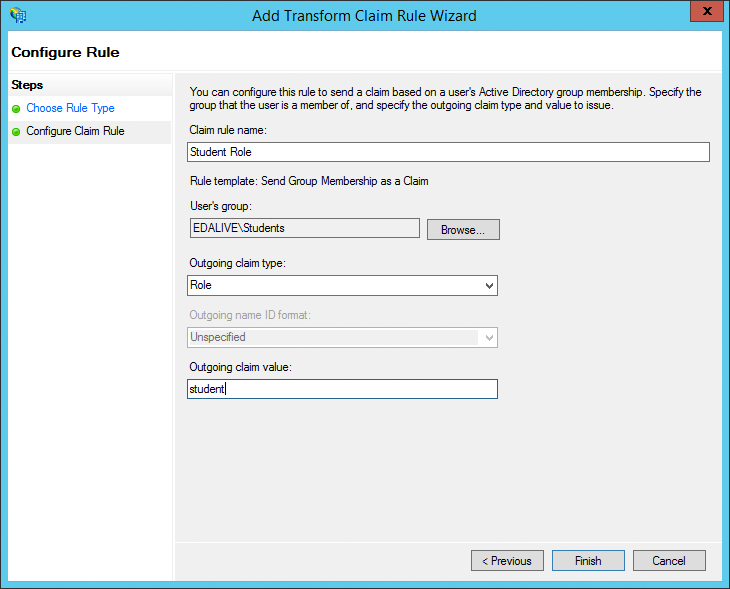
Configure ADFS to Provide User Roles
Configure ADFS to provide the role attribute in ADFS by creating two more rules, both based on the "Send Group Membership as a Claim" claim template.
- Set the "Outgoing claim type" to Role
- Enter the "Outgoing claim value" as "student" or "teacher" as appropriate

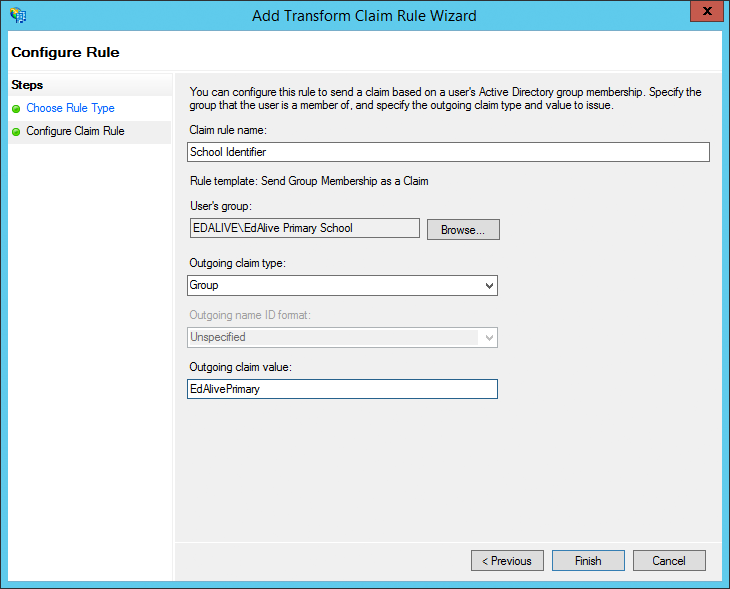
Configure ADFS to Provide School Identifier
If your ADFS server hosts multiple school entities, you will need configure ADFS to provide the School Identifier attribute in ADFS by creating a rule based on the "Send Group Membership as a Claim" claim template.
- Select the school's group from the User's Group browse dialogue
- Set the "Outgoing claim type" to Group
- Set the "Outgoing claim value" to the school identifier you wish to use for this school e.g. the school's name or AGEID.
Repeat this process for each school hosted on the ADFS server. You will need to provide us with a list of each school's real name and chosen identifier.
Send us your Federation Metadata and Domain Details
Provide the following details via email to support (@) edalive.com:
- A copy of your SAML Metadata file (or a link to it)
- The domain name portion of the email address your students will use to login (e.g. jimj81@smithsfieldps.edu.gov.au)
- If your ADFS server hosts multiple schools we will need the School Identifier claim value for each school hosted on the server.
Class Management with ADFS
In order to be able to sign in, your students will need to be part of a EdAlive Central class. This can either be accomplished by manually using the "Add/Move Students" button in the Teacher Management section to allocate students to classes after they have signed in. Or alternatively by providing students with a unique "Class Code" before they first sign in using their Federated login. These Class Codes can be found at the top of the EdAlive Central class administration screens.
- Log in to your EdAlive Central Teacher Account
- Click the "Create Class" button to create a new class
- Give the class a name using the pencil icon at the top of the screen
- Take note of the "Class Code" that is shown next to the class name
- Repeat this process for each class in the school
- Provide the teachers and students with their Class Codes
How Students Login Using Single Sign On
- Choose "School Login" from the options on the EdAlive Central login page (alternatively, we can provide an embeddable link that you can provide to students on their school portal page or desktop)
- Enter the student's school email address
- The system will check that Single Sign On has been configured and then take the student to the school's own SAML login endpoint
- It's important to note that their username and password are secure and not seen by EdAlive Central
- The first time a student logs in, they may be prompted or permission to use EdAlive Central and to select "I am a Student" and to enter their Class Code and other details if necessary
- On subsequent logins, students will be taken directly to the EdAlive Central Main Menu after logging in ADFS SSO
Related Articles
EdAlive Central (Schools) - Single Sign-On (SSO)
EdAlive Central provides easy access using a range of Single Sign On (SSO) systems including Google, Facebook, Office 365, Microsoft Azure and SAML enabled ADFS services. EdAlive Central Single Sign On The EdAlive Central system is in itself a Single ...EdAlive Central (Schools) - (Video) Setting up Single Sign On (SSO) - Azure
Microsoft Azure Single Sign On instructions link: https://central.edalive.com/sso-help-azureEdAlive Central (Schools) - Single Sign-On (SSO) - Class Codes
The Class Code is a unique identity code for each Class in EdAlive Central. It allows users to quickly link to their Classes without requiring them to search for and manually select their school and class. It is only displayed next to the class’s ...EdAlive Central (Schools) - SSO - Azure App Setup Process
⚠️ Please make sure to delete any existing EdAlive Central Azure applications before creating a new one. Azure App Setup Process in Summary Add a New Non-gallery Enterprise Application Configure the Single sign-on SAML settings as: Basic SAML ...EdAlive Central (Schools) - Google and Google Classroom Single Sign On
To make it a as quick and simple as possible for students to sign in to EdAlive Central, we now support Single Sign On with a range of applications. Using Single Sign On, students can login using their existing school username and password without ...
Download the PDF Guide

Download the PDF Guide
Download the PDF Guide

Download the PDF Guide
Download the PDF Guide

Download the PDF Guide

Download the PDF Guide

Download the PDF Guide